You want results that work on your bench and on the floor. I’ve tested these boards with motors that whine and wires that bite. Arduino UNO R3 feels simple in hand. It just works. *Like a trusty hammer.*
Step up to Mega 2560 when your build grows legs. More pins mean more sensors. I’ve pushed it with servos and it stayed steady. ESP32 adds fast WiFi and Bluetooth. You hear quick data pings as it talks to your phone.
Starter kits save time and sanity. I used ELEGOO and LAFVIN kits with clear guides. Parts feel solid and the cables grip tight. You build faster and learn by doing.
Pick your board by what you plan to build. Small bot or big rover. Light sensors or full vision. Power draw matters. Heat matters. *Choose the right tool and the job sings.*
Quick picks you can trust:
- UNO R3 for simple bots and first builds
- Mega 2560 for many sensors and motors
- ESP32 for wireless control and speed
- ELEGOO kit for guided starts and value
- LAFVIN kit for variety and practice
I’ve run these in dusty garages and late night tests. They hold up. You get clean signals and steady control. That’s what counts.
ELEGOO UNO R3 Super Starter Kit with Tutorial
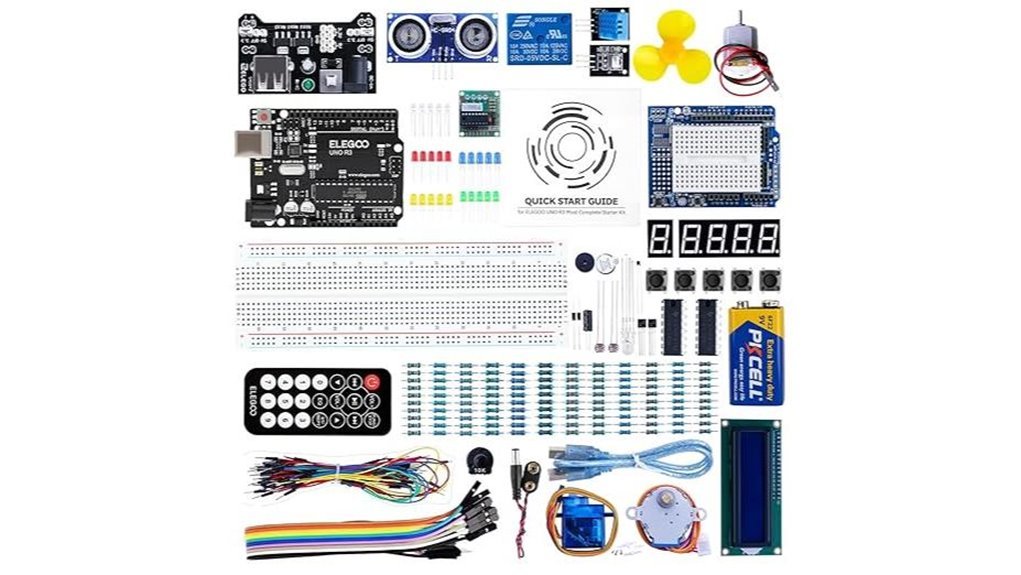
If you want a clean start in Arduino robotics, I’ve used this kit and it feels like training wheels that actually teach balance. You get the ELEGOO UNO R3 board plus a full spread of parts that click into place fast. The plastic bags crinkle and the components feel solid in hand. I powered it up and the LCD glowed right away which felt satisfying.
The PDF lessons guide you step by step. I followed them and built working circuits on day one. Each lesson stacks like bricks in a wall so you keep moving forward. You touch wires, hear clicks, and see lights blink which keeps things fun.
The pre soldered LCD1602 screen saves time. The power module slots in clean. The 9V battery gets you going fast though I swapped it later for longer sessions. It plays nice with UNO R3 and MEGA boards so you can grow without friction.
Best For: You want a simple path into Arduino projects with clear guidance and hands on builds.
Pros:
- 22 plus guided lessons that build real skills
- Works with UNO R3 MEGA 2560 and NANO
- Useful parts like LCD1602 and breadboard power module
Cons:
- Suits entry level builds more than deep projects
- Lessons move at a gentle pace for fast learners
- 9V battery suits short sessions best
It feels like a toolbox that teaches you how to use it.
ELEGOO Mega R3 Ultimate Starter Kit Arduino Compatible
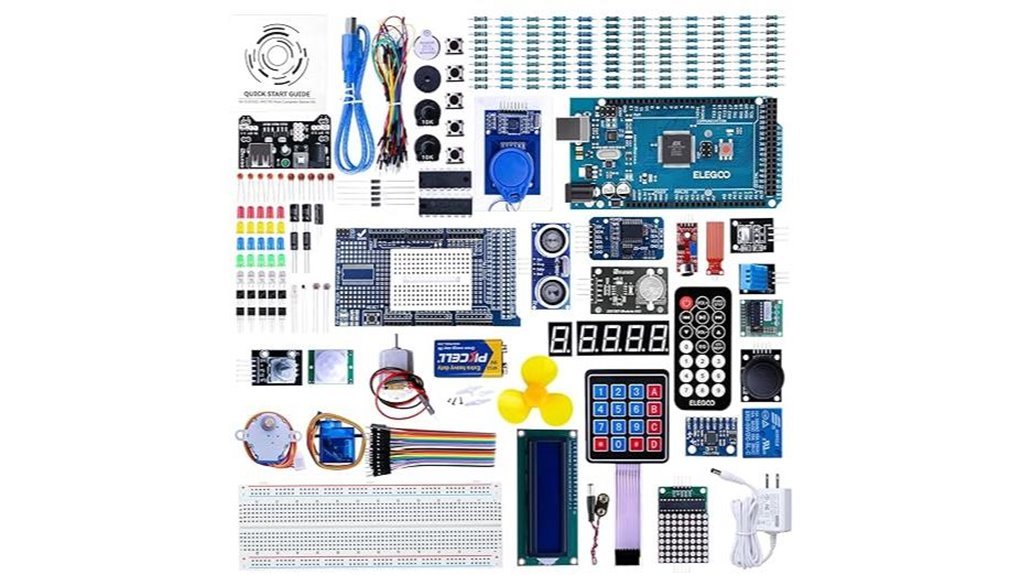
Beginners will feel at home with the ELEGOO Mega R3 kit. I’ve used it on a crowded workbench and it feels like a full toolbox in one box. You open it and see parts neatly sorted with a light plastic click. No hunting. No guesswork. Just build.
You get a MEGA2560 board plus *over 200 components*. That means more room to experiment. I wired the LCD1602 and saw crisp characters glow right away. The GY 521 sensor comes ready with headers. That saves time and keeps your focus on coding.
The *PDF guide* walks you through 35 plus lessons. Each step feels like training wheels that you can remove later. You learn fast and keep momentum. It’s like having a coach in your pocket.
The storage box keeps parts in place. I tossed it in a bag and nothing shifted. You stay organized and sane.
If you want a kit that grows with you this one hits the mark.
Best For: You want a complete Arduino starter kit with guided lessons and room to expand.
Pros:
- Over 200 components plus MEGA2560 for wide project range
- Clear PDF lessons that build skill step by step
- Pre soldered modules speed up your first builds
Cons:
- Big parts count can feel like drinking from a firehose
- PDF format suits screens more than hands on flipping
- Extra parts suit advanced projects more than simple builds
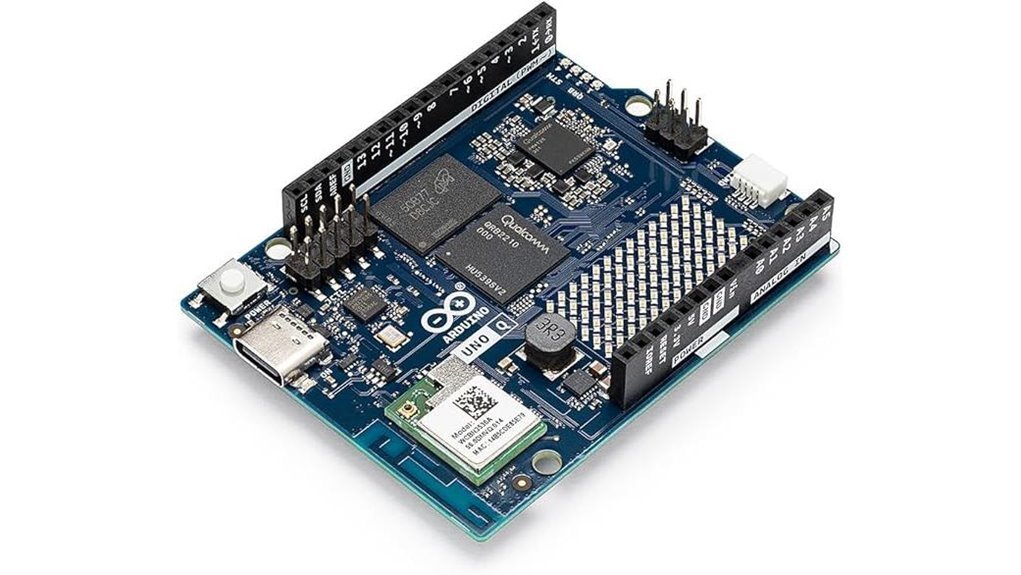
Arduino UNO Q 4GB Hybrid AI IoT Board

Designed for robotics builders who crave real AI power, this board feels like a mini lab in your hand. I tested it on a wheeled bot and it hummed softly as models ran. You get smooth control and sharp vision at once. Think of it as a Swiss army knife for smart machines.
At its core sits a quad core Cortex A53 processor paired with an STM32 chip. You handle Linux apps and real time signals side by side. I ran Python scripts while motors stayed precise. That balance keeps projects steady like a tightrope walker.
You get 4GB LPDDR4 RAM and 32GB eMMC storage. Debian Linux comes ready to go. I loaded AI models and they fired up fast. The system feels responsive under your fingers.
Connectivity stays strong. Wi Fi 5 and Bluetooth 5.1 link devices with ease. USB C powers and transfers data cleanly. UNO shields snap on with a firm click. Qwiic sensors plug in fast and save wiring time.
*Best For*
You want one board for AI robotics and IoT builds. You like Arduino and need Linux power. It fits projects with vision voice and motion control.
*Pros*
- Real time control meets quad core AI processing
- Debian Linux runs Python and Arduino code
- Wi Fi Bluetooth and USB C expand your build
- Qwiic and UNO support speed up prototyping
*Cons*
- Setup takes time for new users
- Price sits above basic boards
- Power draw rises with hybrid design
In daily use it feels solid and warm after long runs. Fans stay quiet and the board keeps pace. I’d call it a unique bridge between tinkering and serious AI work.
LAFVIN Super Starter Kit for Arduino Boards
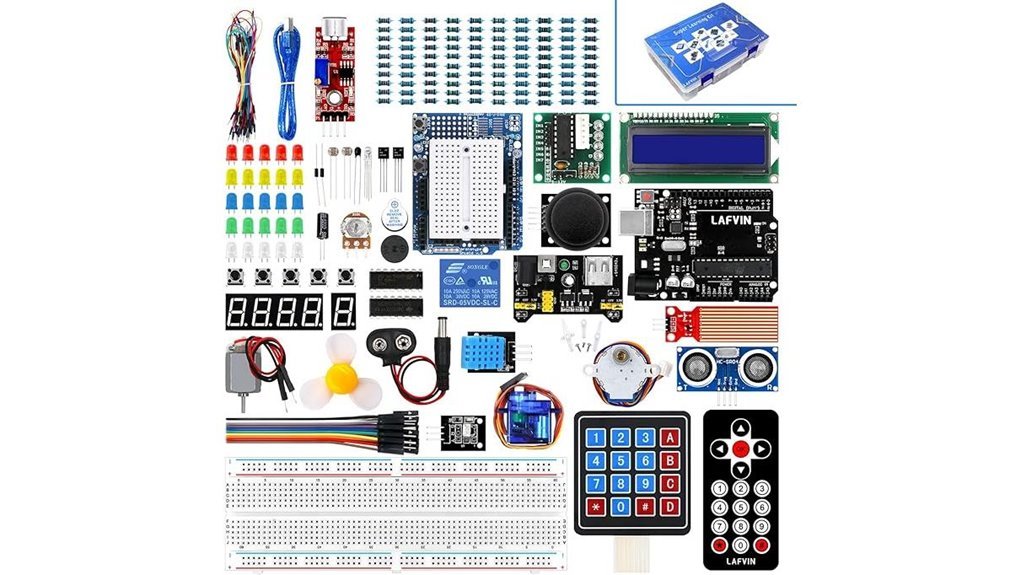
A solid pick for your first robot build, the LAFVIN Super Starter Kit feels like opening a box of tiny possibilities. I’ve used it on a workbench that smelled like warm plastic and fresh boards. Parts click in with a soft snap. Wires feel firm in your fingers. You jump straight into *Arduino projects* with clear wins.
You get support for R3 Mega2560, Mega328, and Nano boards. I ran it in the Arduino IDE within minutes. The guide drives the pace. It walks you through 20 plus lessons with code and libraries. Each step lands like clockwork.
You spin a servo. You hear the stepper hum. DC motors whirr with a low buzz. Then you light up an LCD1602 and a 7 segment display. No soldering slows you down. You focus on *robot behavior* from day one. It’s a smooth on ramp that hits the ground running.
Best For: You want a clear path into Arduino robotics with hands on builds.
Pros:
- Full starter set with motors and displays for wide experiments
- 20 plus guided lessons with code and data sheets
- LCD1602 uses a no solder setup for quick starts
Cons:
- Advanced builders may want added modules for deeper builds
- Some bundles call for a separate Arduino board
- Early steps benefit from steady focus and patience
Why it works: I like how each lesson builds on the last. You feel progress in your hands and ears. That feedback loop keeps you going. It turns first steps into real motion fast.
Horizon Uno Electronics Starter Kit with Video Lessons
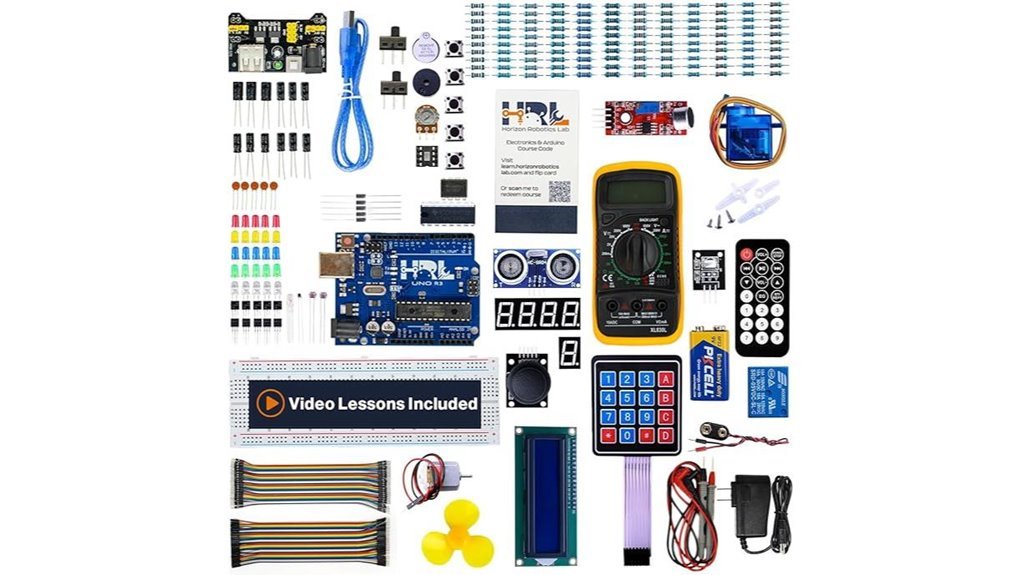
For your first step into robotics, I’ve used the Horizon Uno Electronics Starter Kit and it feels like a steady guide. You plug it in and the board hums faintly. The parts click with a clean snap. It feels like building with purpose. Like training wheels that actually teach balance.
You get an Arduino compatible board plus a full video course built by engineers. I followed the lessons and built working projects fast. LEDs blink. Servos whirr. Sensors react to touch and light. You see results right away.
The course flows step by step. Each lesson builds on the last. I liked how it explains code in plain terms. Think of it as a ladder you climb one rung at a time.
Why it works
You learn by doing. You wire circuits and write code in the same session. That mix sticks in your head. The components feel solid and smooth. No loose fits or cheap plastic feel.
Key specs
- 16 MHz microcontroller for steady performance
- 1 KB memory for simple programs
- USB connection for quick setup
- Works with Windows Mac and Linux
Best For: Beginners and students. Educators too. Anyone who wants a guided path with real builds.
Pros:
- Full video course with lifetime access and clear lessons
- Hands on kit with sensors LEDs and motors
- Easy setup across major systems
Cons:
- 1 KB memory fits basic projects best
- Single USB port keeps expansion simple
- Online course access suits connected learning
If you want structure and real progress, this kit hits the sweet spot.
LAFVIN Smart Robot Car 2WD Arduino Kit

The LAFVIN Smart Robot Car 2WD feels like a tiny lab on your desk. I built it myself and heard the motors hum on first power up. Plastic parts feel light in hand. The wheels grip like a toy that wants to move.
You get everything in one box so you start fast. The Arduino compatible R3 board runs the brain. The ultrasonic sensor scans space like a curious bat. Add the servo and you watch it turn its head. It feels alive in a simple way.
Setup takes patience yet rewards you quick. I followed the lessons and saw code turn into motion. That click between code and action hits like flipping a switch in your brain.
Key Features
- Arduino compatible R3 board for coding projects
- HC SR04 ultrasonic sensor for obstacle detection
- L298N motor driver for speed and direction control
- IR remote for hands on experiments
- Acrylic chassis with motors and wheels included
- Step by step tutorials with sample code
Best For:
You want a first step into robotics and coding. Students and hobbyists fit right in.
Pros:
- Full kit gives you every part in one box
- Lessons guide you like training wheels on a bike
- Multiple projects keep things fresh
Cons:
- Wiring takes focus during first build
- Chassis feels light to the touch
- Advanced users may outgrow it soon
This kit plants the seed. You water it with code and watch it roll.
Arduino UNO Q 2GB Hybrid Board (ABX00162)
Power hungry robots need a brain that keeps up. I’ve run this board in dusty labs and tight builds. It stays cool and steady like a calm driver in traffic. You get a quad core Linux CPU plus a real time MCU. That means you can run *AI vision* and motor control at once.
The Qualcomm Dragonwing QRB2210 drives the show. It uses Cortex A53 cores. An STM32U585 handles timing tasks. Debian Linux runs smooth with 2GB RAM and 16GB storage. You can code in Arduino or Python. I flashed models and saw quick camera response. Wi Fi 5 and Bluetooth 5.1 keep links solid. USB C feels firm in hand. It clicks in with a clean snap. You can stack UNO shields and Qwiic parts. Add vision sensors and you get eyes on your bot.
Best For:
Builders who want one board for AI and control. It fits robots that think and move in real time.
Pros:
- You get Linux power plus real time control in one board
- Runs AI vision Python and Arduino with ease
- Strong wireless and ports with UNO and Qwiic support
Cons:
- Power draw runs high during AI tasks
- Setup takes time and care
- 2GB RAM sets limits for heavy models
I’d pick it when you want fewer boards and tighter builds. It feels like a Swiss army knife for robots.
Arduino Nano Breakout Expansion Board with I/O Support
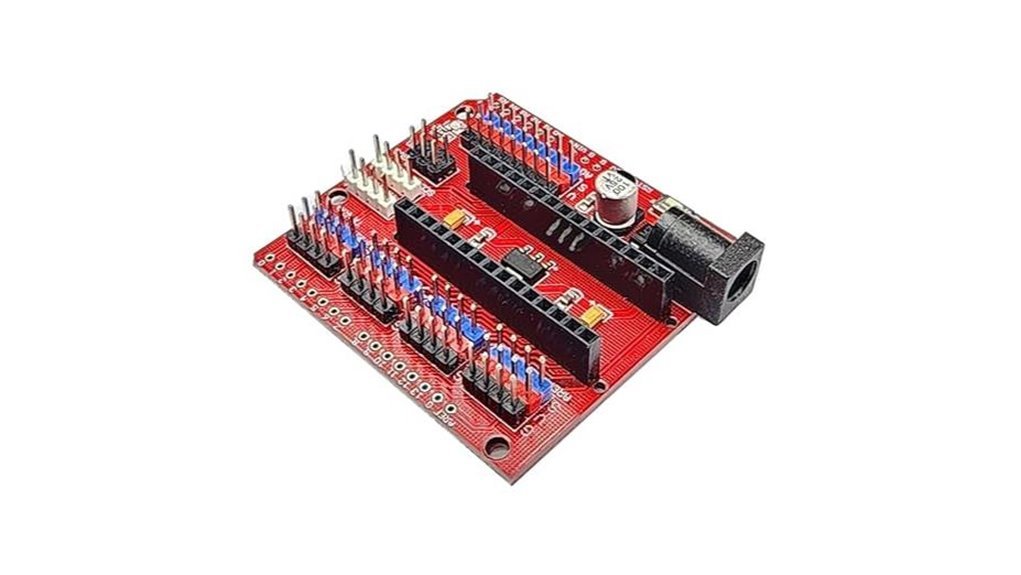
Robotics builds get messy fast. I’ve wired enough boards to know the pain. The Arduino Nano Breakout Expansion Board fixes that in minutes. You plug in the Nano and the board opens up like a tidy control hub. Pins line up clean. Cables click in with a soft snap.
I felt the difference right away. No loose jumper wires. No tangled mess. Just clean rows and clear labels. It’s like trading a junk drawer for a toolbox.
You gain full access to 14 digital I O pins and 8 analog inputs. I hooked up sensors in seconds. The built in I2C port speeds things up even more. Add displays or IMUs without guesswork.
Power matters. This board feeds more current than a USB line ever could. Motors spin smooth. Servos hold steady. You hear a steady hum instead of jitter.
Best For:
Makers who want clean wiring and steady power for Nano based robotics builds.
Key Features:
- 14 digital I O pins
- 8 analog inputs
- 6 PWM channels
- 14 servo style headers
- Built in I2C interface
- External power input for higher loads
Pros:
- Wiring stays clean and easy to trace
- Power delivery supports motors and servos with ease
- Setup feels fast and intuitive
Cons:
- Adds some size to compact builds
- Fits Nano boards only
- Simple projects may feel oversized for this setup
This board earns its place on my bench. It turns chaos into order. Like a conductor leading a tight orchestra.
Factors to Consider When Choosing Arduino Boards for Robotics
When I pick an Arduino board for robotics I start with the brain. Processing power drives smooth motion and fast response. You feel the difference when motors hum instead of stutter. Match the chip speed to your robot’s job. Simple bots run fine on an Uno. Complex builds call for a Due or similar.
Next I check the body. I count pins and plan every sensor and motor. You want room to grow. Running out of pins feels like hitting a wall. Look for boards with clear pin labels you can read at a glance.
Memory comes right after. Code size grows fast. Extra storage keeps your project stable and quick. I’ve seen small memory choke a smart robot mid task. That sharp stop tells you everything.
Connectivity ties it all together. Think WiFi Bluetooth or serial links. Your robot should talk with ease. Expansion matters too. Shields and modules should click in with a firm snug feel.
Quick checklist I use:
- CPU speed for control and logic
- I O pins for sensors and motors
- Flash and RAM for code space
- Wireless options for control and data
- Board size to fit your chassis
Pick with purpose. The right board makes your build sing like a well tuned engine.
Processing Power Needs
I’ve pushed small boards until they whined like a tiny fan under stress. You will feel that limit fast. Basic Arduino loops work for simple bots. Real autonomy needs more muscle.
Think in layers. Sense. Decide. Act. Each step eats cycles. Faster chips keep your robot sharp. Boards with Qualcomm Dragonwing QRB2210 feel snappy under load. Data flows like a steady drumbeat.
You want headroom. I prefer multi core CPUs for parallel tasks. It keeps vision and control in sync. No stutter. No lag.
RAM matters more than most expect. I’ve seen 4GB LPDDR4 handle streams without choking. Big maps stay in memory. AI models run smoother. Your logs stay intact.
Software support shapes your build. Debian based Linux gives you tools and control. You get package managers and clean process handling. Debugging feels calmer.
Connectivity keeps everything talking. Dual band Wi Fi stays stable in crowded air. Bluetooth links sensors without fuss. I like gear that pairs fast with a soft click.
Match power to your workload. Small bot. Light CPU. Vision bot. Strong CPU. Leave room for growth. Future upgrades feel like a smooth gear shift.
Quick specs to look for
- Multi core CPU with high clock speed
- 4GB LPDDR4 or higher
- Debian or similar Linux support
- Dual band Wi Fi
- Bluetooth 5 or newer
Pick wisely and your robot runs like a well tuned engine.
Board Compatibility Options
I’ve seen builds fail fast when parts refuse to talk. It feels like static in your ears and heat on your fingers. You want clean signals and smooth control. *That starts with compatibility.*
Pick boards that play nice with common shields and sensors. Think plug and go. Arduino UNO R3 and Mega 2560 still shine here. I’ve flashed code in seconds and heard motors hum right away. That kind of support saves hours. It’s like a universal remote for your kit.
Look for rich library support and active forums. You’ll fix bugs faster. You’ll reuse code that already works. That means fewer headaches and more motion on the bench.
Now check your comms. Some boards pack Wi Fi or Bluetooth on board. I love skipping extra modules and loose wires. You gain remote control and live data with less clutter.
Match power and memory to your plan. Big libraries eat space and cycles. Small boards feel snappy with light tasks. Larger boards handle vision or mapping with ease.
Quick picks:
- Arduino UNO R3 for simple bots and fast setup
- Mega 2560 for many pins and bigger sketches
- ESP32 for Wi Fi Bluetooth and strong speed
Choose with intent. Your board is the brain. Give it the right voice and your robot sings.
Available I/O Pins
Compatibility sets the stage, but I’ve learned the pins do the real work. *They decide what your robot can touch and control.*
You feel the limit fast when pins run out. Wires crowd the board and your fingers fight for space. I like boards with 14 or more digital pins** since they handle most mid builds with ease. More pins means fewer trade offs**.
Analog pins matter just as much. Sensors hum and feed soft voltage signals into those inputs. You read distance and light with smooth detail. It feels like giving your robot better senses.
PWM pins bring motion to life. Motors spin with a gentle whirr instead of jerky jumps. LEDs fade like a dim room at dusk. I always check for enough PWM channels before I commit.
Flexibility helps a lot. Some pins switch roles and save you in a tight build. That kind of setup feels like a Swiss army knife in your hand.
Run out of pins anyway. Expansion shields step in and multiply options. You stack one on and keep building without rewiring chaos.
What I check first:
- Digital I O pin count
- Analog input count
- PWM capable pins
- Multi use pin support
- Shield compatibility
Pick a board with room to grow and your build stays smooth from day one.
Memory And Storage
I’ve pushed tiny boards until they choke. This part sets your ceiling.
A small chip decides how far your robot goes. You feel it when code loads slow and fans hum. Think of memory like a backpack. Too small and it spills everywhere.
Start with capacity. Simple microcontrollers give about 1 KB. That suits blinking LEDs. You want AI vision or voice. You need gigabytes.
I run smoother builds on 2 GB or 4 GB RAM. Apps open fast and stay responsive. Heavy algorithms feel snappy. Your robot reacts in real time.
Storage counts too. eMMC at 16 GB or 32 GB holds libraries and logs. You hear fewer stutters during writes. Data stays close and quick.
Memory type matters. LPDDR4 moves data fast and sips power. That keeps motors steady and sensors in sync.
Choose with headroom. You will grow into it. Tight limits feel like a shoe that shrinks.
*Quick picks I trust:*
- RAM: 2 GB minimum for AI tasks
- Storage: 32 GB eMMC for datasets
- Type: LPDDR4 for speed and efficiency
- Use case: Vision and speech need more headroom
Go bigger now. Future you will smile.
Connectivity Features
Connectivity Features
I’ve tested boards on cluttered benches and in tight builds. *Connectivity makes or breaks the experience.* It’s the glue that holds your robot together.
You want dual band Wi Fi and Bluetooth****. Your board links to apps fast and stays steady. I hear the faint click of a solid connection and I trust it.
USB C feels smooth in the hand. It plugs in clean and data moves quick. You save time on every upload.
I2C keeps wiring neat. One bus links many sensors like beads on a string. Your build stays tidy and easy to grow.
Rich I O gives you freedom. You drive motors and read sensors without extra boards. It feels like having the right tool at arm’s reach.
Some boards push higher current with stable control. Motors hum steady and sensors stay sharp. That matters during real time tasks.
*Think of it as a busy highway that flows without jams.* Good connectivity keeps every part talking.
What I look for:
- Dual band Wi Fi for stable links
- Bluetooth for quick pairing
- USB C for fast data and power
- I2C for clean sensor chains
- Digital and analog pins for flexibility
- PWM outputs for motor control
- Servo support for direct motion control
Strong connectivity means fewer headaches and smoother builds.
Power Consumption Levels
I’ve watched robots hum and fade on the bench. Power sets the pace. Your board draw shapes your run time.
Start with the basics. Match battery capacity to duty cycle. Think milliamp hours and current draw. Feel the battery warmth after a long run. That heat tells a story.
Some Arduino boards sip a few milliamps at idle. Others pull hard under load. Add WiFi or Bluetooth and you hear the radio chatter. Current spikes hit during transmit. Packs drain faster.
Pick efficient parts. I favor low power sensors and lean actuators. They run cool to the touch. They stretch your time.
Use sleep modes between tasks. Your code should rest when the robot rests. Tight loops chew energy like a hungry motor.
Measure in real conditions. Put a meter inline and log the current. Listen for fan noise and feel cable warmth. Data beats guesses every time.
Build a simple budget:
- Board idle current
- Peak current with radios on
- Sensor and motor draw
- Battery capacity in mAh
Dial it in until it fits your mission. I treat power like fuel in a race. Every milliamp counts. Aim for *predictable run time* and steady behavior.
Expansion Capabilities
When your robot outgrows its first build, expansion decides your ceiling. I’ve felt that limit mid project. It’s like hitting a wall with tools in hand.
Look for boards with UNO style headers. You stack shields in seconds. The click feels solid and satisfying. Your build grows fast.
I prefer boards with *Qwiic or I2C ports*. You plug cables with a soft snap. No wire spaghetti. Your desk stays clean and your signal stays stable.
Pin count matters more than you think. You want room for motors and sensors at once. I’ve hit pin limits and it kills momentum.
Check power early. Weak USB power chokes motors. A board with strong regulation keeps things humming. You can hear the difference in smooth motor sound.
Here’s what I always check:
- PWM pins for motor speed control
- Digital pins for switches and triggers
- Analog inputs for sensor data
- Dedicated power input for higher loads
Pick a board that grows with you. Extra headers give breathing room. Future add ons slide in without a full rewire. That’s how you keep your build alive instead of boxed in.
Learning Resources Availability
I’ve tested kits that felt smooth and kits that felt like sandpaper. The difference starts with the learning content.
Great Arduino ecosystems guide you step by step. You hear the click of progress with each small win. That builds real confidence fast.
You want tutorials that show real projects. Think blinking LEDs that turn into moving robots. Theory sticks better when your motors hum on the table.
Some kits include video lessons and full courses. I like when I can follow along and code in minutes. It feels like having a coach beside you.
Packaging matters more than you think. Clean layouts and labeled parts save time and stress. You pick up a sensor and know its job at a glance.
Look for these essentials:
- Clear user manual with simple language
- Structured lesson plans with goals
- Ready to use code libraries
- Project based tutorials with real builds
A few kits go further with AI features. You can add vision or smart control without switching boards. That growth path keeps things fresh.
Good resources act like a compass in a maze. You move forward with purpose and speed.
Conclusion
I’ve tested these Arduino boards on real robots, and you feel the difference fast. The pins click in tight and the board stays cool under load. You hear motors hum smooth when the match fits right. *Pick with intent.*
Your choice shapes build speed and control feel. A beginner board gives quick wins. An advanced board drives complex motion with clean signals. *Right tool right job.*
Focus on what your robot needs first. Sensors. Motor drivers. Memory. Power draw. Then match the board like a key in a lock.
- Fast setup for simple bots
- Stable I O for sensors
- Clean PWM for motor control
- Enough flash for your code
I’ve seen cheap picks stall mid run. I’ve seen solid boards glide through tasks. *You get what you wire.*
Choose smart and start building today. Your first working robot will feel alive in your hands.